
How to self-host a Minecraft server on Linux with Paper
A practical step-by-step guide to running a Minecraft Java server on Linux with Paper, including setup, updates, backups, and the operational work that starts after launch.
If you want full control over your hardware, plugins, backups, and update timing, self-hosting a Minecraft server still makes a lot of sense.
This guide walks through a clean Linux setup for one Minecraft Java server using Paper. It assumes a recent Debian or Ubuntu-style system, a specific Paper version chosen before you start, and a basic comfort level with the terminal.
Quick answer
If you want the shortest path, do four things first: match Java to the Paper
build, run the server as a dedicated Linux user, manage it with systemd, and
open 25565/TCP in the right place. Most first-day setup failures come from
the wrong Java version, missing EULA acceptance, or firewall mistakes.
See the setup shape first
If you want a narrated pass before you start copying commands, this third-party walkthrough covers the same Linux flow end to end.
Pick your environment first
Choose this path if the server runs on a machine behind your own router.
You will usually need:
- a stable LAN IP for the server
- a router port forward for
25565/TCP - a host firewall rule if one is enabled
Choose this path if the server runs on rented cloud or dedicated infrastructure.
You will usually need:
- an inbound firewall or security-group rule for
25565/TCP - the service listening on the expected interface
- no consumer-router port forwarding at all
What a good first install looks like
Java matches Paper
You checked the exact Java version against the Paper build you chose.
The service restarts cleanly
You can start, stop, and restart the server with one predictable command.
Players can connect
The game port is reachable from the right network path for your setup.
Backups exist before updates
You can roll back world and plugin data before changing the server.
Why use Paper instead of the vanilla server
For most self-hosted Minecraft servers, Paper is the sensible default. It is widely used, performs better than vanilla in most real-world cases, and gives you the plugin ecosystem most admins already rely on.
The piece that catches people out is the Java requirement. Paper publishes a version-to-Java compatibility matrix in its getting-started docs, so pick the Paper build first and install the Java runtime that matches that row.
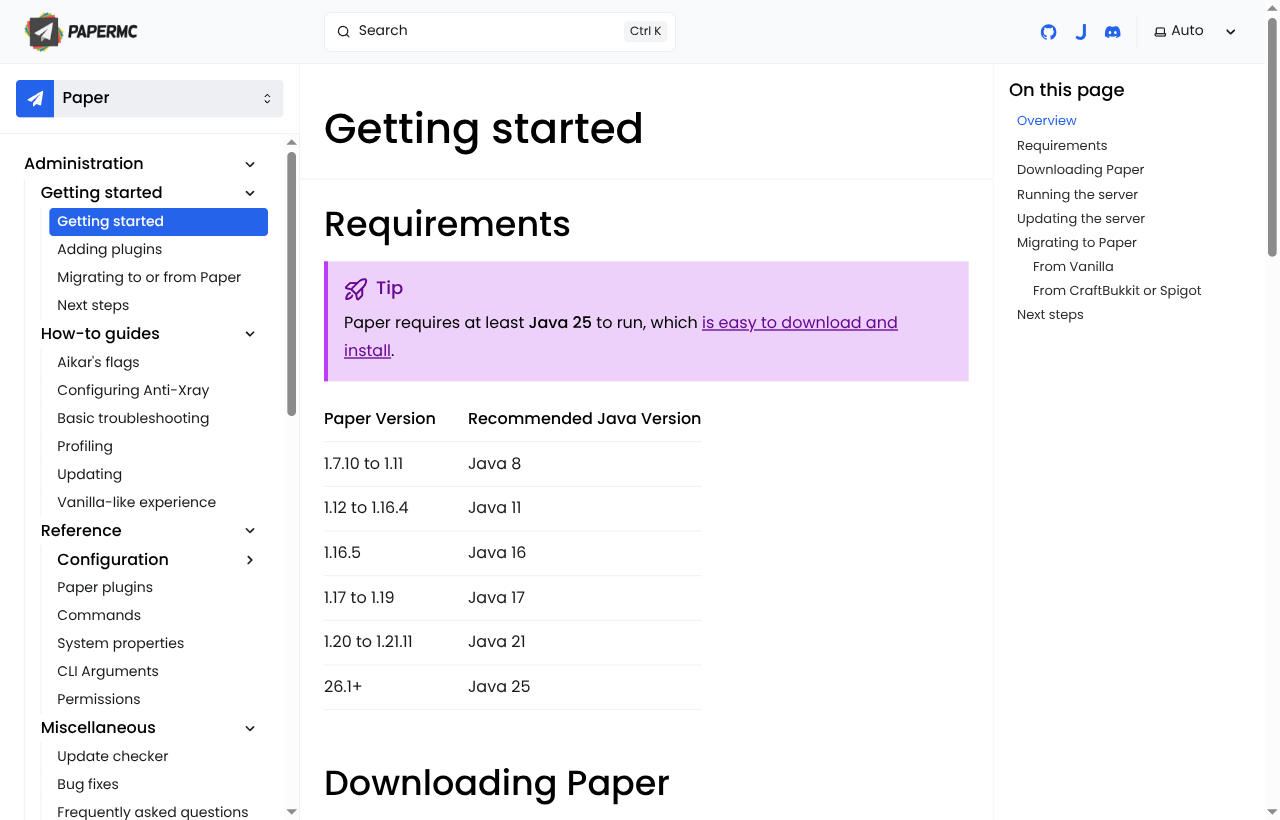
That is why the first thing to verify is not RAM. It is the exact Java version your chosen Paper build needs.
What this guide covers
This guide is for one self-hosted Java server on Linux.
It covers:
- installing the correct Java runtime
- creating a dedicated Linux user
- downloading and starting Paper
- running the server with
systemd - opening the game port
- handling basic updates and backups
It does not cover:
- setting up a proxy network with Velocity
- running multiple nodes or multiple game types
- hosting a public control panel like Pterodactyl
Before you start
You need:
- a Linux machine or VPS with
sudoaccess - enough RAM and CPU for the player count you expect
- a reachable network path for players
- a Paper download URL for the exact Minecraft version you want
If this server will be public, also decide now whether it will live:
- on a home connection behind a router
- on a VPS with a cloud firewall or security group
That difference matters when you get to networking.
Set the server up
Install the right Java version
First, choose the Paper build you plan to run. Then check whether Java is already installed:
java -versionIf you do not have the required version yet, install it with your package manager. For example, on a recent Debian or Ubuntu system:
sudo apt update
sudo apt install openjdk-21-jre-headless
That package name is an example for Paper builds that still use Java 21.
If you choose a build that Paper documents as requiring Java 25, install a
Java 25 runtime instead.
Verify again:
java -versionCreate a dedicated server user
Do not run your Minecraft server as your normal login user or as root.
Create a dedicated system user and a home directory for server files:
sudo useradd \
  --system \
  --home /srv/minecraft \
  --create-home \
  --shell /usr/sbin/nologin \
  minecraft
Create a place for the live server and backups:
sudo mkdir -p /srv/minecraft/server
sudo mkdir -p /srv/minecraft/backups
sudo chown -R minecraft:minecraft /srv/minecraft
Download Paper
Paper publishes runnable JARs from its downloads page. Copy the exact
download URL for your target version, then switch to the server user and place
the file in the server directory. Naming it paper.jar keeps later commands
simple:
sudo -u minecraft -H bash
cd /srv/minecraft/server
curl -Lo paper.jar "<paper-download-url>"
You now have the server binary, but the rest of the server files do not exist yet. The first start creates them.
Run the server once and accept the EULA
Start the server once so Paper can generate the working directory:
cd /srv/minecraft/server
java -Xms2G -Xmx4G -jar paper.jar --nogui
The first run stops because the EULA has not been accepted yet. Edit
eula.txt and change eula=false to eula=true:
sed -i 's/^eula=false$/eula=true/' /srv/minecraft/server/eula.txtAt this point you also have server.properties, logs/, plugins/, and the
world folders on disk.
Create a start script
You can start the server with a long Java command every time, but it is cleaner to put that command in a script.
Create /srv/minecraft/server/start.sh with content like this:
#!/usr/bin/env bash
cd /srv/minecraft/server
exec java -Xms2G -Xmx4G -jar paper.jar --nogui
Then make it executable:
chmod +x /srv/minecraft/server/start.shTwo quick notes here:
Xmxis the maximum heap the JVM can use- more RAM is not always the answer to lag, especially if your single-core CPU performance is weak
- do not set
Xmxright up against a VPS, container, or panel memory limit
If you are hosting a small friends-only server, start conservatively and
increase memory only when you have evidence that you need it. If the host
gives the process a hard memory limit, leave room for Java outside the heap
and for the operating system. Paper's troubleshooting docs call out crashes
where the memory limit is too close to -Xmx.
Run the server with systemd
systemd is a better long-term setup than manually keeping the process alive
in a shell window.
Create /etc/systemd/system/minecraft.service:
[Unit]
Description=Minecraft Paper Server
After=network.target

[Service]
User=minecraft
Group=minecraft
WorkingDirectory=/srv/minecraft/server
ExecStart=/srv/minecraft/server/start.sh
Restart=on-failure
RestartSec=10
LimitNOFILE=65535

[Install]
WantedBy=multi-user.target
Reload systemd, enable the service, and start it:
sudo systemctl daemon-reload
sudo systemctl enable --now minecraft
Useful commands from here on:
sudo systemctl status minecraft
sudo journalctl -u minecraft -f
sudo systemctl restart minecraft
sudo systemctl stop minecraft
Open the game port
For Minecraft Java, the default server port is 25565/TCP unless you changed
it in server.properties.
If you use ufw, open that port:
sudo ufw allow 25565/tcpIf this server lives behind a home router, you also need to forward
25565/TCP from the router to the machine's local LAN IP.
If this server lives on a VPS, you usually do not need "port forwarding" at
all. You need an inbound firewall or security-group rule that allows
25565/TCP.
Set the basics in server.properties
Before inviting people, open server.properties and set the obvious items:
motddifficultygamemodemax-playersview-distancesimulation-distancewhite-list
Two defaults matter more than people think:
- Keep
online-mode=trueunless you fully understand the security tradeoff. - Turn the allow list on if this is meant to be a private server.
A few server.properties fields deserve extra care:
| Setting | Why it matters |
|---|---|
server-port | This is the game port players connect to. The Java default is 25565. |
server-ip | Leave this blank in most setups. Paper's reference says it controls which interface the server binds to, not the public IP players should use. |
online-mode | Keep this true for normal public servers so Minecraft account authentication stays enabled. |
white-list | Enable this for private servers so only selected players can join. |
enforce-whitelist | Enable this when you want players who are removed from the allow list to be kicked. |
view-distance and simulation-distance | Keep these conservative on small VPS or home hardware. They can affect CPU and memory more than new admins expect. |
Use Paper's server.properties reference when you are unsure what a field actually controls.
Install plugins carefully
Paper becomes much more useful once you add plugins, but plugin quality varies a lot.
A few practical rules:
- add one plugin at a time when the server is new
- keep a copy of the plugin JAR and its config before large changes
- restart only after you know what changed
- track your plugin versions alongside your Minecraft version
The messy part of Minecraft administration often starts here, not at the Java install step.
Back up the right things
At minimum, back up:
- the world folders
plugins/server.properties- any plugin-specific config that matters to your economy, permissions, or moderation flow
For a small server, a simple first pass is enough:
- stop the server cleanly
- archive
/srv/minecraft/server - copy the archive to another disk or object store
Do not treat "the disk is still there" as a backup strategy.
Update without making a mess
Paper updates are usually straightforward, but major Minecraft upgrades still deserve caution.
A safe update flow looks like this:
- Take a backup.
- Read the Paper and plugin changelogs for your target version.
- Replace
paper.jarwith the new build. - Start the server and watch the console closely.
- Check that plugins, permissions, and world loading all behave normally.
If you jump across major Minecraft versions, expect at least some plugin churn.
Common first-day mistakes
Check Java before you do anything else. A lot of "broken update" reports are really just version mismatches between the Paper build and the installed JVM.
Read logs/latest.log and journalctl first. The most common causes are a
missing EULA acceptance, a bad plugin, or a command path problem in your
systemd unit or start script.
That is usually a networking split, not a Paper problem. On a home server, check the router forward. On a VPS, check the cloud firewall and host firewall rules.
Where self-hosting gets harder
Most guides stop once the server is reachable. That is the easy part.
The ongoing work is what consumes time:
- reading logs when a plugin breaks after an update
- editing configs without losing context
- keeping track of who changed what
- updating plugins safely
- inspecting player issues without bouncing between SSH, FTP, and chat
- handing the server off to teammates without giving everyone raw shell access
That is the gap between "I can run a Minecraft server" and "I can operate this cleanly every week."
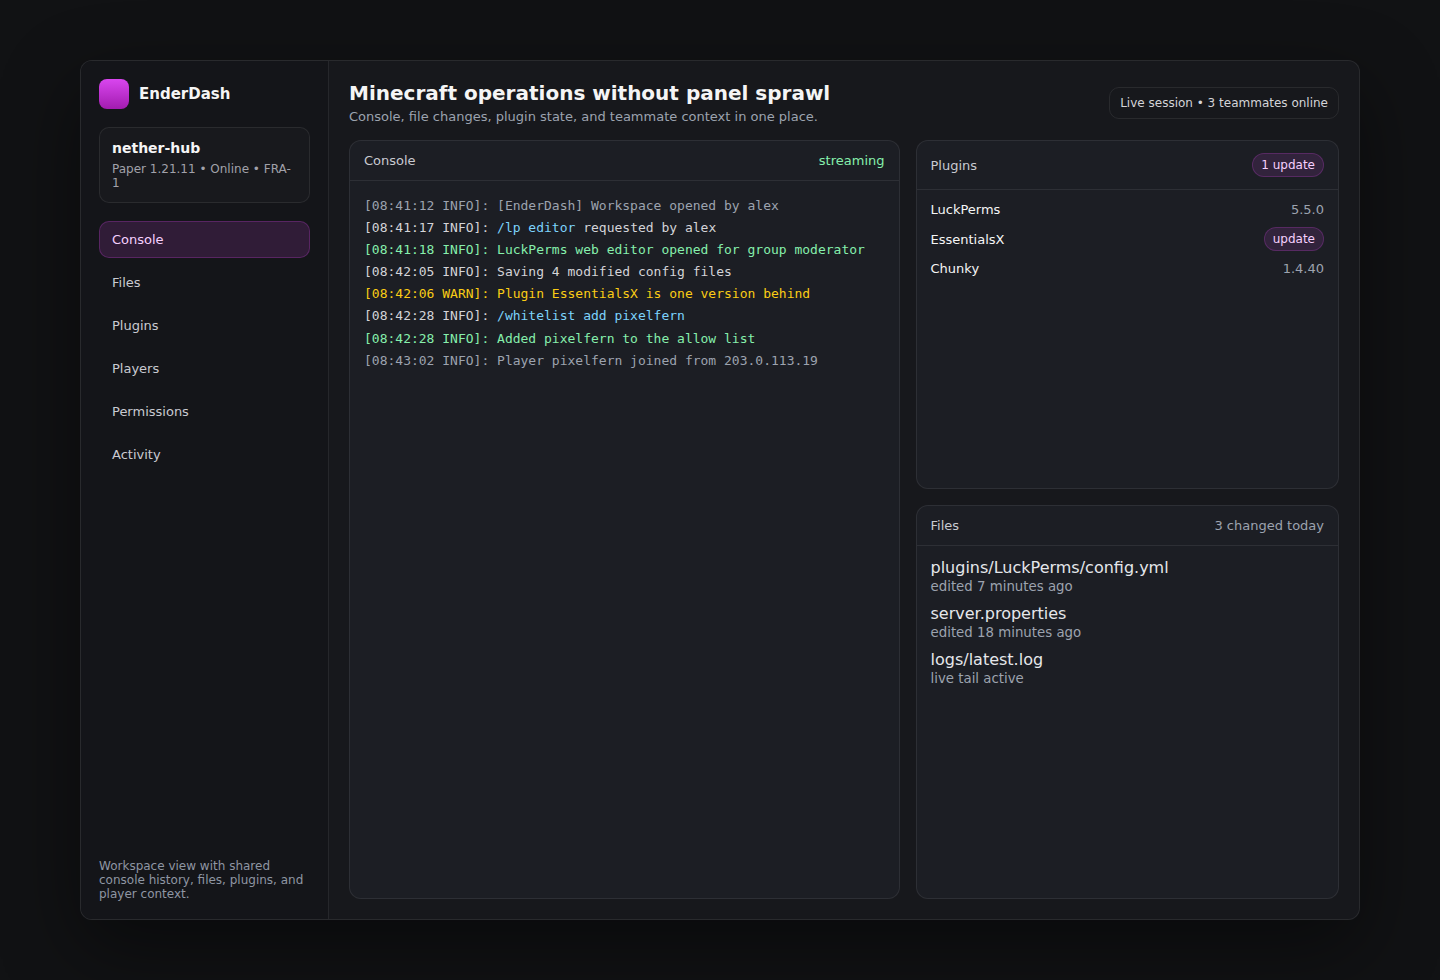
Where EnderDash fits
If you like self-hosting the game server but do not want to babysit a second public panel, that is where EnderDash is meant to fit.
The server stays on your infrastructure. You keep your host, your Linux box, your plugin stack, and your world data. EnderDash is the admin layer for the day-to-day work after launch: console, files, plugins, permissions, players, and shared operational context.
If you want to see that flow, start with:
Connect Your First Server
See what the post-launch operational layer looks like once the server is up.
Server Panels
Browse the surfaces EnderDash exposes for console, files, plugins, players, and more.
Recover an Offline Server
Use the docs flow when the agent or connectivity side is the actual problem.
Related articles
Can EnderDash upload custom JARs to Aternos?
EnderDash can make custom JAR uploads and Linux shell access easier on hosts that allow the agent, but it cannot bypass Aternos' free-hosting restrictions.
How to identify bot players and IP ban evasion on a Minecraft server
Learn which network, geography, session, and join-failure signals help reveal bot waves and players who may be bypassing IP bans, and how EnderDash makes that evidence easier to inspect.
Minecraft server port forwarding not working? Check these things first
A practical troubleshooting guide for Minecraft Java server port forwarding problems, including LAN testing, firewalls, double NAT, CGNAT, and VPS-specific gotchas.